ads

Slider[Style1]

Style2

Style3[OneLeft]

Style3[OneRight]

Style4

Style5

Manny Diaz: Bulletproof Fire Zone


"I always think that schemes are overrated....We're going to attack out of a multiple array of fronts. If I had my druthers, I'd like to play a 5-4-5, which you're not allowed to do. But I want the offense to feel...like we've got about 13-14 guys running around. We want to look like we have an unfair advantage."

The youth movement injected into the University of Texas program has generated a lot of buzz recently. The hope is that the new found energy translates to on the field production after a lackluster performance during the 2010 season. One reason to be especially excited is that replacing legendary defensive mind, Will Muschamp, is Mickey Andrews / Chuck Amato protégé, Manny Diaz. Diaz’ eager hustle, passion for fundamentals, and keen attention to details is apparent in his body of work through NC State, Middle Tennessee, and Mississippi State and are what have propelled him on the fast track to success. Having never played college ball, Diaz doesn’t get caught up in over-complicating the game, but keeping his scheme idiot-proof.


“Offense and defense is about asking questions and having answers.
When an offense presents something, the defense has to answer.”

With the advent of the versatile 1-back gun in today’s offenses, defenses need to account for so many attacks that they must figure out what exactly they are looking to defend. Diaz believes that to stay ahead of the curve, to, a defensive coordinator needs to force the ball to go where he wants it to go, rather than attempting to just ‘defend the whole field’. With this approach, you are left with even more reason to include fire zones.
 
FIRE ZONING THE RUN GAME

“Dare the offense to run – then make them run into something they don’t want to run into”

Throughout the 90s by the way of Miami, defenses transitioned to the mantra of speed, with the defensive ends becoming the most disruptive players on the field. The more offenses game planned and tried to deal with these athletes, the more they realized they just couldn’t block those guys. This is what has brought us to the current flavor of offense, where they don’t even block the defensive ends (read game).


“Don’t let them make decisions – with fire zones you make all the decisions for them”

Combating the gun option, Diaz feels the fire zone is the perfect RUN defense because of the key-breaking look it presents. In most fire zones, you will overload one side of the ball with 4+ rushers with the backside dropping into coverage. For a quarterback, you are faced with a confusing picture.


If you read the backside end on zone-read, a defensive end that crashes (attacks the back) will tell you to pull the ball and run. If the backside end hangs or stays lateral, the quarterback should give to the back.


The problem is, against the fire zone, “none-of-the-above” is the answer. As you see in these pictures, if a quarterback sees the backside end hanging (not attacking the backfield) as he would if he were dropping, the quarterback would give to the back, who would be running straight into the teeth of the blitz.

With the fire zone, Diaz feels he can get the best of both worlds as it is an 8-man front with middle-of-the-field support with 6 defenders covering 5 potential receivers.

“Its just Cover 3 with a hook player blitzing – that’s a fair exchange.
It is the most stable thing I can run”

A large part of the success Diaz has experienced with fire zones is due in large part to the way he employs them. Simplicity is the key, contrary to most defenses, Diaz believes in spot-dropping with his 3-deep, 3-under to prevent his defenders from thinking or making mental errors. In this post, we explore how he defines and installs his foolproof approach to the fire zone.

FIRE ZONE
Much like how Nick Saban installed his middle-of-the-field coverage principles (curl-to-flat / hook-to-curl players), Diaz teaches ‘jobs’ instead of specific instructions. There are only 3 positions to be defined for this to work. The only thing that a defender needs to know is which one of the three will he be (and adhere to the simple rules for each).

The basic 3 deep fire zone features a long sticking defensive line away from the blitz with two backers or a backer and a defensive back rushing. The simple rules of this scheme allow you to mix and match who will be the rushers.

 Diaz has found that when running fire zones, they eliminate front calls (less for the defense has to worry about) with the only thing the defensive line has to know is that there is a fire zone going on and which side the blitz is coming from. When you know that, the line will just align away from the gap they intend to stunt to.
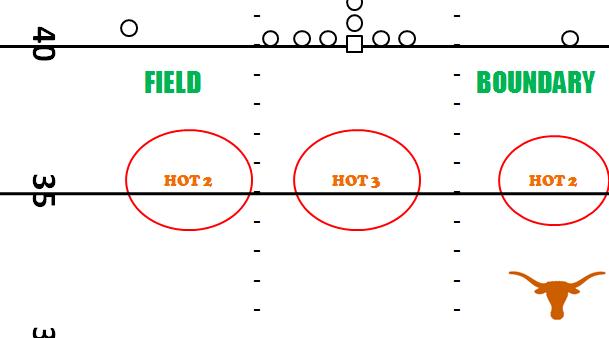

The rules and integral pieces of the fire zone are as follows:

“Hot 2 to the field”
Defender is a curl-flat player. “Hot 2” means #2 receiver will be the hot target versus blitz (receiver will stem 5 yards and turns around against blitz). This defender simply has to control #2 (or whoever becomes #2) hot versus a pass read. The landmark will be 2 yards outside the hash (or the hash to the field in high school).  If the quarterback continues to drop, he will get to 12-14 with his eyes on the quarterback.  Versus a run read, this player is the contain / force, and will outside-in leverage the ball.

“Hot 3”
This is a simple job.  On pass, he is simply to get to the middle of the field (regardless of where #3 is) defending space in the hole. If the quarterback continues to dropback, he will fall to a depth of 12 yards.
Versus the run, he simply has to recognize who #3 is and relate to him and spill with inside-out leverage.
Versus option, he is a dive player only.

The Hot 3 player is the only player that can exchange assignments with a defensive end (called “switch”).
Switcher – is the linebacker away from blitz that will be the Hot 3 player (DE away is the Hot 2 player). If there are two receivers removed, the DE can’t possibly play the curl (Hot 2) so the Hot 3 player (linebacker) will make a “switch” call. All this does is ensure that the offense doesn’t make you check out of the blitz or out-leverage you. The Hot 3 and Hot 2 will switch assignments and the linebacker will walk-out and align inside #2.

“Hot 2 to the boundary”
This player will drop to 4 yards outside hash (2 yards outside the high school hash) to the boundary. Like the other Hot 2 player, he will drop to 5 yards against quick step and 12 yards against drop back pass and will be contain on run with outside-in leverage.

Usually the Hot 2 to the boundary will be a defensive end (brining field pressure). The coaching for the defensive end is simply, “Just go backwards” – that’s it.  When in the boundary (“hot off of #2”) if #2 is in the backfield (i.e. some type of 3x1 to the field), this player must tackle him if he runs an inside run. In the boundary, this technique is exactly like you would play as an outside linebacker in a traditional 44 defense.

*Once you declare who #3 is, all of the pieces fall into place and there remains no more thinking involved in the defenses.

Outside Blitzer
When bringing extra pressure with backers and backs, one of the rushers will be the outside (or contain) blitzer. This player is geared to get after the quarterback, but must recognize how he fits into the blitz. On back flow away, he will have the quarterback outside-in. With flow to, he will tackle the running back (on play-action or not). Versus lead-option, this blitzer will immediately take the quarterback (as the Hot 2 player outside of him will take the pitch).

Diaz will teach how to drop to the field for a month to build competency, then will acclimate his players into counting guys and understanding the support fits against the run game. The beauty of this approach is that the fire zone now becomes an “offensive play” for the defense and can be practiced during 7 on 7.   The rationale here is to install it (all of it) quickly and just run it over and over to work out the details on the fly.

Effectiveness of Blitzers

The most underrated element to Diaz’ approach to fire zones, is the coaching of the blitzers. With the fire zone, the defenders are attacking PEOPLE (not gaps).
The stunts tell the players how to penetrate, then attack the passer. The mindset here is to treat blitzers like ball carriers (the blockers are tacklers), that after taking the proper path, the blitzer should “find the open grass”.
 
Instead of telling a player to “blitz the A gap”, he will sell it as “you blitz the guard”. The philosophy is to take the path of least resistance; the quickest way to disrupt the passer. The blitzer will fight the soft shoulder of the blocker (not try to struggle where the blocker is strong). If the blocker sets hard inside, the blitzer has the freedom to bounce his path and fight the soft (outside) shoulder and take the easiest way to the quarterback.


COVER 2 CHANGE UP: “TRAP”
With any good attack, you need a counter-punch, a change up. With playing MOFC coverages such as Cover 1 and 3-deep fire zone, it is important to keep an answer up your sleeve for when the offense gets wise to what you’re doing. The TRAP fire zone is strong where fire zone coverage is weak. With Trap Coverage, Diaz uses man-match coverage (not spot dropping….except for the flat defender).
ScreenShot238

Trap fire zone is just a changeup that will have two blitzers outside the Mike linebacker (which can play havoc on protection that adjust to the MLB). Just as detailed above, once you define the jobs within the coverage, plugging and playing defenders can be simple.
ScreenShot237


“SEAM PLAYER” – Defender will be inside and on-top of whoever is ‘seaming’ unless he goes to the flat (look up inside cut to the curl).

“BUZZ / TRAP PLAYER” – This will be the strong end to the call and will be the buzz defender (playing from inside-out position) that shoots to the flat away from the trap defender. The corner to the blitz side will be the trap defender (corner is playing from wide position). This corner should be trying to show that he’s 3 deep as he is in fire zone coverage, but will be hanging on the flat. The rationale here is to make it look like a blown assignment by the corner. He will plays the gap inside #1 on run. As a trap player, the corner will rob the slant or he will carry #2 on the wheel. Again the simplicity here is what is important; when the trap player doesn’t even move, he ends up in a better leverage position.

“½ FIELD DEFENDER” – This will simply be the backside corner and safety. The rules are simple, seam #1 by remaining inside and on top #1 unless he goes to the flat (even on a shallow by #1). The deep half player will act as the eyes of the corner. Versus a Hi-Lo (CHINA) concept, the safety yells, ”CHINA”, so he can match him. If the offense comes out in 2 backs the safety will seam the back away from the blitz (if he blocks or is free releasing)
Because you have 4 underneath defenders, there is no switch call in trap coverage.
With trap coverage, there are some basic guidelines to ensure everyone is on the same page and aligned for success:
  • Vs empty…..LB has to walk out
  • VS 1 back – MLB has #2 and the WLB has #3
  • VS 2 back – WLB takes #2 weak or #3 strong
 
As you can see there is nothing revolutionary to what Diaz is doing, but the method he uses to simplify his scheme and is something that can be picked up by young players and develop a hyper aggressive defense that appears multiple and complex but remains easy to digest.


Additional Resources:
2010 Ole Miss vs Miss State
2010 Arkansas vs Miss State
2010 Bama vs Miss State

30 Dime Package: Part I

My name is Chris Vasseur and I coach Safeties at a Junior College in Northern California. I have befriended Brophy on the infamous Coach Huey website (I go by “VassDiddy” over there). I truly consider him the best defensive coach in all of High School football and I have learned so much from him. He invited me to write for this blog and I am extremely excited and honored to do so. I have contributed to the blog before (Virginia Tech Robber and Nick Saban’s Rip/Liz Match articles) but never have written an article.

My first topic is the “30 Dime” blitz package. The 30 Dime package is commonly referred to a 3 DL, 2 LB, and 6 DB defense used in long yardage situations (3rd & Long, 2 Minute). Since I base out of a 4-2-5, I already have 5 Defensive Backs so I would only make one change. I would take out the lesser of the two interior pass rushers, and bring a 6th DB (could be a Safety or a Corner) on the field. For 3-4 or true 4-3 teams, you might have to make 2 substitutions. The change of personnel is all based on your team and what you are facing. Against certain opponents, I would bring my best Corner in the Slot and bring in a 3rd Corner to play outside.

I believe this is the future of the NFL and will eventually permeate college football. I know… you are probably thinking: “Vass, this has been going on for years. What are you talking about?” True, but the implementation and thought process is changing. Teams are no longer just using this as a prevent defense, but as their primary method of pressure. Unless you have two dominant interior pass rushers, this package is perfect. In the first installment of my Dime package manifesto, I will examine why I began utilizing this format and the various coverage combinations that you can utilize. The second part will delve into the blitz and coverage possibilities, and how you can make combination calls to gameplan offensive formations and protections. The third part will examine how I use a “menu” effect to gameplan 3rd Down to create endless possibilities, showing you how you can easily customize this package to fit your system.

Let me start by saying that I am, and have always been a “40 Front” coach. I know there are many ways to skin a cat, and for me, I prefer the 4-Man line. I love the versatility and adjustments versus most offensive formations. I also like the ability to stop the run and play pass without a call or change of personnel, unlike the 3-4. I also think the fronts require less specialization than a traditional 3-4 defense – I believe you only need one true defensive lineman (3 technique) and one true linebacker (Mike). Plus, I went to school and worked briefly for, the University of Miami where the 4-3 was altered and turned into what it is today. I also worked for one of the Godfathers of the 4-4 to 4-2-5 movement. Needless to say, I am a little biased towards the 4-Man line.

My philosophy led me to discover this package. I love to pressure. However, I don’t like to just rush 1 extra defender, because I don’t feel the pressure is really getting home. Conversely, I am not one to roll the dice all the time and just leave people uncovered and/or play with no deep coverage. Don’t get me wrong, I’ll bring 6 or an 8-Man check blitz, but not as the primary method of pressure. This is why I love Fire Zones. They provide a middle ground. You have the ability to overload the offense’s blocking scheme and truly put pressure on them, while having sound, deep coverage. Plus, the creativity and possibilities are endless.

So, I researched everything I could get my hands on. I looked at playbooks, broke down games, talked to coaches, attended clinics, etc., all hoping to learn cutting edge Fire Zones. Over the years, I came to this conclusion: the Over front is great at overloading the weakside, but overloading to the strong side opens up major holes to the weakside (mainly having the slowest and least athletic lineman, the 1 technique, looping to contain, two gaps over). In the Under front, you can overload the strong side, but the weakside overloads aren’t as easy to run (Mike is too far to the strongside to bring). You can bring the Weak Safety down to blitz, but if they have 2 WRs to that side, now what? You have no one to cover! My solution was to blitz from the weakside from the Over front, and stem to an Under front pre-snap, to bring strong side pressures. The problem was solved… or so I thought.

I began coaching with my semi-pro team the spring and had all these face-melting (one of Brophy’s favorite adjectives) blitzes I had collected and installed. The league was a predominantly passing league, which was a departure from the high school league I coached in; our Defensive Ends had to be true pass rushers. We got into the first game and we needed to start bringing pressure to make things happen. The problem was this: in the Over Front, to overload the strong side or up the middle, I had to drop my Weakside Defensive End who is arguably the best pass rusher in the entire league. For the weakside overloads, I had to spike him into the A or B gap. I tried bringing 5 and playing Man-Free and nothing got home. Bring 6? It was almost like an automatic Touchdown. I eventually said, “screw it” and went back to a 4-man rush and the Quarterback had about 7 Mississippi’s to throw it. Needless to say we didn’t do well…


I began looking for answers. I busted out the playbooks and notes I had collected, and watched replays of NFL games. I watched the best defenses in the league at pressuring the Quarterback (i.e. – Jets, Saints) and saw that they were using these 3-Man lines. With this package, we could take out the Nose (my worst pass rusher who had to contain with strongside overloads) and bring in an additional Defensive Back, and bring the same pressures. The best part? I could bring my beast Weakside Defensive End, 100 miles an hour.


I had seen this package before, but they were doing something different. They were running what has become the “traditional” fire zones, the same blitzes with Man-Free coverage, and a Man-Free Peel coverage. They brought 6, played coverage with 6, and had their Defensive Ends still rushing the passer.
The key was that they assigned each edge rusher to “rush to cover the Running Back.” This is especially effective in the NFL because most protections are 6-Man, so he’s going to stay into block anyway.

The 30 Dime Front, allows the defense to run the same blitz paths with different coverage combinations, easier than a 40 front. You could feasibly run the “NCAA” blitz with Fire Zone Cover 3, 2 Trap (2 Deep/4 Under), Roll Cover 2, Man-Free, and Man-Free with an additional rusher and peeling Defensive Ends. When I ran the Over and Under front zone blitzes, I had to try to find one blitz to cover what I wanted to defend – I had to try to find one blitz to beat the protection AND defend the types of routes. If I wanted to bring the “NCAA blitz” for example, I had to play 3 Deep/3 Under, or a poor version of a Roll Cover 2. However, with the 3-Man line, I could create a “menu” because the blitz “paths” were separate from the coverages and were not tied together like the 4-Man line. Now all I had to do was teach the basic coverage concepts (3, 2 Trap, Roll 2, and Man-Free, Man-Free with Peel) and could bring whatever paths I wanted and slap them on a wristband.

To illustrate this point, let’s examine a problem I ran into before I decided to use this package. We faced a Sprint-Out passing team and tried running the infamous “NCAA” blitz to overload the strong/sprint-out side. It beat the protection, but there was a huge problem. We were short to the strongside of our coverage. This is because our Hook 3 player is lined up all the way to weakside and the QB could quickly and easily dump the ball to the 3rd WR. With the Dime package, the DE now rushes and I can simply bring the Dime back over to cover #3. Or, if we wanted to play zone, we could roll the coverage and play a Roll Cover 2 to the Trips side. I began to tinker with the idea and I realized that I could gameplan to beat the protections by choosing the blitz path I wanted. After I decided how to defeat the protections, I could gameplan the coverages I wanted based on the formations they ran, type of passing game, and routes.

An additional bonus of this package is that the Guards have one more thing to worry about. In our 40 Front, one had the 3 technique and the other combo’d the 1 with the Center. In the Bear (which we run a lot of), they were both man-to-man. In the 30 Front, the Guards have to Dual Read, a completely different read and technique.

Also, the Dime package allows us to keep the zone coverage responsibilities consistent. Out of a 4-man line is that you have to exchange coverage responsibilities with your DE and ILB. If only 1 WR, the DE drops Wall to Flat and the ILB has to drop Hook 3. If there are 2 or more, the ILB has to drop out to Wall/Flat and the DE drops inside for Hook 3. This is because you don’t want a Defensive End carrying a Slot WR vertically.

This may seem like a lot of stuff. It can be if you look at each blitz as its own separate entity. However, if you teach the coverage concepts, mixing and matching blitz paths with them is simple. In fact, I used this with a semi-pro team that practiced once a week, and only 50% of the team showed up. With the cunning use of wristbands and simplicity in teaching coverages, you can mix and match all of these concepts to create your own menu.

In the next installment, I will detail the various paths and coverages you can use in detail. Also, I will touch on how you can make “combo calls” to designate the coverages you want to play versus 2x2 sets, vs. 3x1 and Empty sets.

I look forward to contributing more and please feel free to ask questions, comment, or heckle me in the comments section.

Good luck this season and I’ll “see” you soon!
-Vass

P.S. Thanks Korey Gray for helping me discover this package by telling me you didn’t want to drop anymore. I was blinded by all the fancy X’s and O’s and I didn’t let my best player do his thing.

BRONCO/SCIF Player

As covered many times in various forms before, the fire zone blitz concept is prevalent in today's game. In this post, we'll cover probably the most under documented aspect of it, the SCIF player. Losing an underneath zone defender to pressure may cause some 'fundamentalist' thinking DC's to lose sleep... "how do you account for the four underneath zones"?

The 5-man pressure package can seem complex or superfluous to many folks, treating it as an alien concept. If you already pattern-match from a MOFC, then adapting to the fire zone for your players and philosophy becomes a natural extension. When players understand zone coverage as it relates to pattern distribution, plugging and playing them into similar roles becomes feasible because of the shared skill set.

When running a fire zone from a coverage standpoint, not much will actually change in the secondary. The fulcrum to this scheme will fall on the integrity of the SCIF/Bronco player, who controls the seams and matches the second receiver in the distribution. This player can be anyone within realistic alignment position (safety, linebacker, defensive end) near the seam. The beauty of the fire zone is its flexibility, you can bring anyone to match / fulfill the 3 underneath players.

If the SCIF player is a member of the secondary, the adjustment is extremely simple. If it is being run out of a 3-man / odd front, there usually is no need to drop linemen to create a fire zone, so you would typically end up with a Dog, Backer, or Safety as the SCIF player. Whoever it may be, the rules and technique will remain the same. The goal is to control the seams, the area between 2 yards inside the hash extending out to the numbers. You are essentially expecting a sack or force a short throw (below the conversion down) and outside (difficult).

This SCIF player must control the seams, which will be immediately threatened by the #2 receiver. On the snap, the defender will keep his eyes on the quarterback, bounce his feet (much like a Cover 4 safety), and easy pedal out with a slide step. Once recognizing drop back action from the quarterback, his eyes will snap to the #2 receiver and continue to slide for depth to stay on top of #2 at a depth of 10 yards.

Because this is a pressure package, the throw, if it occurs, should be quick (under 2 seconds) and not allow the quarterback much time to process through his progressions. If the quarterback's shoulders are directed at the seam, the SCIF player should be expecting an inside or vertical route, to which he has out leveraged the receiver (eliminating the throw). The SCIF defender should know that once the quarterback's shoulders go OUTSIDE the seam (exaggerated toward the flat), there is no way for him to progress back inside (and even if he did, the 'final 3' player would handle it). Therefore, if the quarterback's shoulders turn outside the seam, the SCIF should work parallel (expand width) to the numbers (sideline).
  • If #2 pushes vertically on the seam, the SCIF should catch at 10 yards and carry. He is essentially looking to play 'catch' technique on a vertical stem by #2 with inside-out leverage.

  • If #2 runs a speed out, the SCIF should slide to his outside foot and bust to the curl route, expecting the #1 receiver to be there on a curl-flat combo. The SCIF should not jump the speed out (but anticipate #1 will be the #2 after the pattern distribution).

  • If #2 breaks inside (shallow) underneath 10 yards, the SCIF will attempt to deliver this receiver to the final 3 player in the hole with an outside leveraged collision.

  • If the quarterback's shoulders open AWAY from the SCIF player (he is backside), remember, the quarterback won't have time to work back inside, the SCIF should slide parallel inside, no further than 2 yards inside the hash and help squeeze the ball with the 'final 3' player.

Where things get dicey is when you involve a lineman (end) in coverage as the potential dropper / SCIF player. This really becomes a run stunt because being away from the pressure overload, the defensive end's interior linemen will be stunting to his side. The nearest lineman will be looping to his "C" gap contain responsibilities, leaving the SCIF defensive end as a potential "B" gap filler. Below are some reinforcement drills on how the SCIF DE will mirror the back (load/flare) with leverage. The SCIF DE should always think of himself as a run-player FIRST, and a dropper only if there is no run action by the back.

Nebraska Pressure: 7 Man Blitz


After reviewing their base front, fire zone and dime package, now we'll explore what happens when offenses dictate nickel (substitute a Nickel back for the Buck) based on medium passing downs or 10 personnel package.

In the glory years of the Tom Osborne-era Huskers, the Blackshirts and Charlie McBride lived in what they called "11 Robber". While we'll touch on that in a later post, it essentially was Nickel Cover 1 (1 high MOFC player, 1 low hole player). Because of the matchup advantages in the secondary and the versatility in personnel, these new Blackshirts thrive on bringing maximum heat when in Nickel.

Much like the spinner grouping, Pelini has a preference on bringing pressure, rather than sitting back in coverage or even fire-zoning offenses.


The easiest way to generate maximum pressure on quarterbacks is Cover 0. Every defender accounts for a receiver, and those without will pressure. This concept should not be discounted because of its insane simplicity.

In their most often used pressure concept when in Nickel, is "Over Loose Bomb Blitz".

This is essentially the 'bonzai' blitz from the Jim Mora 49ers playbook that is bringing both safeties. This is perfect against 2-back sets, but is certainly sound against 3x1 or 2x2.

Corners are playing catch-man technique with a 9 yard cushion, able to jump hot throws and deep enough to maintain an over-the-top leverage on deep receivers.

Both safeties will present the 2-high look (like every snap), then begin creeping once the quarterback begins the cadence. They are both attacking the 'B' gap. The interior tackles collapse the A gaps to open this overload blitz in B gaps. This direct and immediate pressure will force quarterbacks to take unnecessary hits and at best scramble into contain players.


The ends will play the common "peel" technique (as covered previously) against any back flow, and inside-out leverage an flaring action. Versus empty, the ends will have no responsibility but to rush the passer.


Take a look at these clips to get a better perspective of how simple and effective a Cover 0 - check blitz is.


On a personal note, I would like to add that even though being a "defensive-guy" and being a coordinator who is not big on man-to-man, that if you do not have a Cover 0 check blitz in your package, you are really missing out. It can be installed within minutes, disguised from any look, and provides a 'cheap' answer during a game that falls outside your game plan. I would certainly encourage any defensive staff member to look at the 'check-blitz' not as a way of life, but as something up your sleeve to before your first game. It is a great way to jump start your defense into winning conversion downs and build the confidence in the team in the early stages of the season.

Nebraska Pressure: Spinner (6 & 7 Man Blitz)

In the first installment, we covered Nebraska’s base front and the base principles about matching fronts with their Buck linebacker. But what happens when your base defense and personnel are not the best tool for the job? What happens when you get in long-yardage situations or the offense gets out of 21 / 11 personnel? How does Pelini handle these special situations?

The spinner personnel grouping (3 DL, 1 Nickel + 1 Spinner) equates to a GATA package, and is premised on just that; getting after your ass. Whenever you see 3 DL in the game for Nebraska you can bet good money that they will likely end up in a 7 man pressure package supported by Cover 0. The most common concept Nebraska will use is known as “Steeler”.


This simply puts the corners and safeties on split receivers and everyone else is collapsing the pocket. This is the simplest pressure package in football and most known as the “Tigercat” blitz from Jim Bates (of 90's era Dallas Cowboys renown). The numbers will always afford for 1 free rushing defender (no matter how many stay in to protect, the defense will always to bring 1 more than they can block).


In spinner, the Ends will align head-up on the tackles to provide the threat of a 2-way go, though they will bull rush through the inside arm, to free up both the “C” gaps for Nickel/Safety edge pressure as well as help open the “B” gaps for Mike/Spinner blitzing. Versus 2 backs, the nose will always take the right “A” gap. Versus 1 back, the nose will bull rush the center. The edge rushers in this blitz have a "peel" assignment that allows them a free path to the passer unless the back releases to their side. In the event of a back release to their side, the rusher should peel off the rush angle and pickup the back in coverage from an inside-out leverage.

All coverage defenders are playing in an off-man or ‘catch’ position on receivers, allowing the receivers to free release. This prevents the coverage defender from giving up a deep throw, as well as, allowing the defender to keep his eyes on the ball, looking to break on the interception the minute the receiver sticks into his break.

If the slot matchup is better suited for a nickel / buck backer, the converse spinner adjustment is known as “thriller”. Exactly the same as "Steeler", with the exception of freeing up the safeties by engaging the Will / Buck ( substitute for Nickel) in coverage on inside receivers.


As a change-up and counter to the Cover 0 pressures, a rotating man-free concept is available provide a little more insurance behind the blitz and provide middle of the field protection.


The Back Dog pressure features an orchestrated overload to the Mike backer side of the ball. The Mike will be supported by a cross-facing nose (to open up the blitz lane), an end, and either the Buck Nickel or corner. The spinner will align away from the back, with the Mike to the back. The Weak Nickel will align to the tight end (or 4th receiver), with the Buc Nickel to the passing strength. This basic concept can be run based on personnel or field/boundary, the only adjustment (called from the safeties) would be from the blitzing corner or Buc Nickel.


Examples of Spinner Back Dog 1 Comet being run:

If you recall (or rewatch), during the Big XII Championship Game, after stalling Texas early in the 1st half, Pelini used his Spinner groupings to pressure McCoy all night into errant throws and interceptions.

This is the primary look Pelini will give once this dime grouping is introduced. He does have other coverage variations (next post) that apply to the base defense, but rarely utilizes them if nothing more than a change-up.

Fire Zone Pressures - William Jones (DC East Mississippi Community College)

( audio of clinic presentation here )

General Zone Pressures
1. A solid variation to stopping the run and rushing the passer, the foundation of a GREAT defense

2. Zone pressures allow you to bring extra rushers and play a safe coverage behind the blitz (not as much risk vs. Cov-0 but still high reward w/ negative plays by offense)

3. As a defensive unit, you MUST work on your run fits and QB (Pressure points of the passer) rush lanes vs various personnel/formations/plays. (Trash cans can be used for walk through and run through).

4. QB/WR are taught concepts of the following
  • Split safety looks C2/C4/C6
  • Post safety looks C3/C1
  • No safety look C0 / man-to-man
    Therefore have certain route concepts and combinations that can be designed against each defensive coverage concept

5. QB/WR is taught when you see a blitz, look to;

  • Will protections hold up and work the “concept side” of the pass play
  • Throw to the “hot side” of the pass play
  • QB/WR may have route/sight adjustments called within pass play of “trouble call” (Blitz side)
  • As a defensive unit we want to identify all or most of the “concepts and hots” that offense want to use to attack our defensive package. (game plan/adjustments)

6. Can “trigger” the QB to make the hot throws vs what appears to be man-to-man coverage and void areas that are in the defense. The zone pressure concepts will drop defenders in those ‘hot areas’.

7. QB will tell you so much at when, where, how.

  • QB Helmet (snap count, hots, checks)
  • QB 1st 3 steps (concept/hots/screens)
  • QB directional Keys
  • QB delivery keys

8. Droppers / Cutters / Screw Down players began on basic progression concept

  • Hot
  • RB
  • Crosser

9. Game Planning

  • Ability to attack the weakest blocker in protection (OL,TE,RB) in a 2 on 1 concepts (high / low, inside / outside)
  • Ability to attack certain protections and trigger certain adjustmetns with blitz threats
    Man
    Full Slide
    Half Slide
    Dual Read
  • Gamble: The QB has to have time to pick out the open WR in the open area

10. 5 man zone pressures are designed in a :

  • 3 deep / 3 under concept
  • 2 deep / 4 under concepts
  • 4 deep / 2 under concept
  • Draw basic concept (Rex Ryan)

--------------------------------------------------------

"Cause A Pause"

At this point, Jones began illustrating several of their 3 deep / 3 under pressures. Among them were two impressive concepts to take note of; "Dog" and 'Mafia'.

To take advantage of an explosive rush end they had last year (#9 Claude Davis, now at South Florida), they used this looping stunt. "Dog", showing man coverage blitz (4 rusher overload to a side) then loop the rush end into the far A gap. With the Nose looping to outside contain and the Mike coming fast in the A gap, the stretch of the opposite A gap opens up.

Out of 3 high

Out of 2 high

"Mafia" was another concept they used to exploit the weakside bubble. So vs man protection it provides an easy path to bring a rusher free, vs run they cover up the weakest gap fit on the front. They have found that looping the nose (away from the mafia stunt) can always get the center to jump this crossfacing defender and really open up the area of attack.

vs tight #2

Normally, vs 2-back, the Will and Mike would be looping into the bubble. In this depiction, vs twins, the safety screws down and replaces the Will and becomes a hot blitzer.

Mafia zone pressure vs twins

Of note on this clinic was the verbiage used to coach the BRONCO ends. To keep them honest and playing run first, they don't coach them to drop, they call them "potential rushers" (courtesy of Pete Jenkins). In "mafia", the drop end now is the hole player. Instead of walling off #2, he is falling inside to the hole and fits on cutback on run away.

Coaching Rules for Mafia Pressure:

TRENDS: Dime Pressure

Noting the trend of defenses to use dime packages even in nickel (11 personnel) situations.

Clips from the past season where 3 receiver-1 tight end formations (standard fare in the NFL) allow the defense to introduce a nickel and dime back and only leave in 2 or 3 defensive linemen.

I intended to go over some of these in more detail, but I've been swamped of late and wanted to share some clips rather than sit on them.


09NYJ_dime @ Yahoo! Video

09NYJets_Dime @ Yahoo! Video

09gbchi @ Yahoo! Video

09gb @ Yahoo! Video

09GB_a @ Yahoo! Video

09MIA @ Yahoo! Video

09NE @ Yahoo! Video


09NOSaints_GWilliams @ Yahoo! Video

Blog (Defense)

If you like blowing shit up, setting fire to cats, and breaking whatever comes your way.....
Be sure to check out the always informative defensive-centric blogs:

"Putting Out the Fire (Zone)" - Gunter Brewer (Part II)

Another way OSU looks to attack the fire zone is with their quick passing game.
(for a detailed view of the staple of OSU’s passing attack, the four verticals package, check out Chris Brown’s blog)
SCAT out of 3 x 1
The scat concept out of 3 x 1 is a great way of exposing the horizontal stretch of a 3 underneath zone coverage. It is an evolution of Y Stick, and further evolved itself to the current spacing concept.

Just like the spacing concept detailed before, the inside receivers are looking to put the middle hole defender in conflict. They work to get in between the MLB and the PSL B at 6 yards and sit down.
The Z (playside outside receiver) runs the clearing fade (FOR / Force Outside Release) to draw greater a void underneath. The shoot by the F converts to a wheel if seeing press man coverage.
The added benefit of 3 x 1 is the bubble route run by the H. This not only provides a release outlet, but also stretches the SCIF player to defend the sideline to the hash.
Regardless of the coverage, this concept is adaptable and can stress the defense regardless of the assignment. The X & Y run a “sneak” (stick) route at a depth of 6 yards to 2-on-1 attack the MLB.
  • Vs zone – split the difference between defenders
  • Vs man – push in hard and bounce back out
If the linebacker crosses the receiver's face, he should look for the ball. If the receiver gets walled (from an inside stem), he will sit and bounce back out (working off of MLB)
This provides a failsafe plan of attack for the quarterback. All he has to determine is if it is MOFC or MOFO coverage and then immediately attack the appropriate defender.
  • Vs 1 high – look weak (key the flat defender)
  • Vs 2 high – look strong (key the flat defender)
  • Vs man – Sneak/Wheel
It is important to see the seams / voids created with so much defensive movement of players replacing one another.
You have to get them, before they get you

Attacking the Linebackers
Against the zone blitz, the inside receiver should look for the dropper (weight not on the hands), and anticipate his drop. The rationale on spotting the dropper, is because in 3x1 the MLB is the target. He will have to expand to #3 away from the hole to match #3’s route dispersion.
When the playside linebacker is in man coverage, he will not be sitting or dropping to the seam, he will be expanding to chase the back on flare (leaving a large void in the area he is leaving). The WR to the chasing linebacker must look for the ball in his first 3 steps. To take advantage of this big-play potential, it is important to identify the coverage presnap via shifts, motions, and altering the tempo.

If the linebacker drops, the receiver will go underneath, work the hole inside, and off the drop of the MLB.


If the linebacker “sits”, the WR must decide the over/under position to best work (find the hole).
If the linebacker walls or prevents an inside release (typically if the defense is aggressively trying to stop follows, meshes, etc) the WR should use a bounce technique and work back outside.

The following is an example of the evolution of the (double stick) scat concept (and how it helped evolve spacing)


Shown here by BYU and NC State, featuring a young Philip Rivers
Does this Y Stick concept from Norm Chow's 1995 playbook look familiar?
It should
Y Stick vs the Fire Zone
This is a great concept to work against the leverage of hole and seam players. This also works against both 1-high (MOFC) and 2-high (MOFO) coverages equally well. Where spacing featured 3 sticks, Scats featured 2 sticks, now Y Stick features just the TE sticking based on the MLB.
1 high defense
With the backside 2 receiver combo, the inside receiver route essentially becomes the shoot route being run on the TE side. Rather than elongate the throw by immediately pressing the sideline, the receiver vertically presses 6 yards and then keys the corner on whether he should sit (if corner sits / flat) or continue expanding to the flat (if corner retreats).
2 high defense
An illustration of the stick concept vs 2-high defense against Texas Tech (actually the very play that the opening picture was taken from)
This play / pictorial best illustrates identifying the 'hot' key of a man-linebacker. Watch the 8 technique SLB racing to chase the shooting F out of the backfield. The SLB isn't dropping, he is quickly widening flat. Recognizing this, the Y quickly turns his shoulder in anticipation of receiving this quick throw.

Once the QB identified man-coverage, he locks onto his Y and is going to deliver the ball away to the shoulder away from the MLB on his hitch step.
(Very little thinking required here - just react to the immediate key)
The TE makes a great catch outside his body, which affords him more room and momentum to turn upfield away from the MLB. Now it is the Y versus the Safety.
The receiver runs over the safety, the chase ensues, and makes a bad-angled corner miss.....and its SHOWTIME in the endzone!


Top